


The glass CO2 laser tube is located on the back of the device and generates the actual laser beam.
Installing the CO2 laser engraving machine: Everything you need to know
OMTech Laser
11.September.2023
As many of you may have already learned, at first I knew very little about CO2 lasers, setting up a CO2 laser engraving machine or operating it. However, after I chose OMTech and bought my first laser, I threw myself headlong into learning as much as I could before my laser machine even arrived.
In this article, I'm going to help you get started so you can hit the ground running on laser tag (the day the laser gets to you)!
Before you begin setting up your new OMTech laser, you should find the latest user manual in the Download Center. Read the manual as you follow the instructions in this article.
Technical terms and definitions
Before we begin the instructions, please familiarize yourself with some of the technical terms used in this article and their definitions:
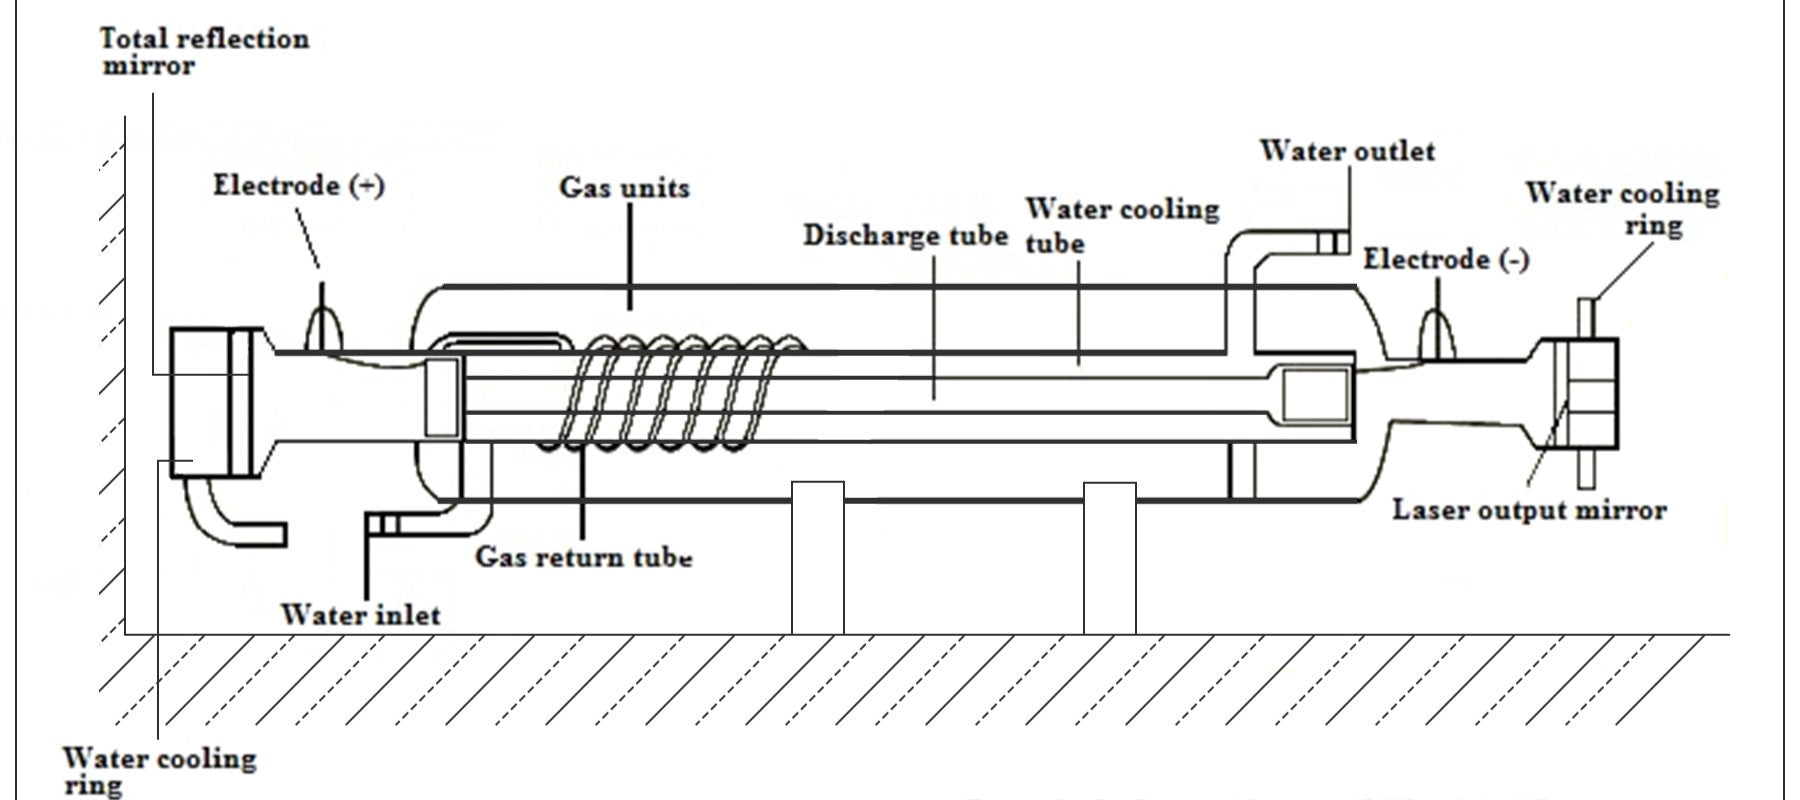
Laser Tube
Laser Cooling System - When the laser tube operates, heat is released. This heat must be dissipated and the laser tube must be cooled to function properly and avoid heat damage. For this purpose, temperature-controlled distilled water is fed through the laser tube using a water pump or an industrial water cooler.
Laser exhaust system - the exhaust system responsible for removing engraving residues (gases, smoke, fumes and airborne particles). This system consists of several individual components, including:
Exhaust vent - the physical vent that comes out of the enclosure or equipment where the laser is located.
Exhaust Port - the physical port located at the point on the laser engraving machine where the exhaust gases exit the machine. Note that the 130W and 150W units have 2 outlet ports.
Internal Fan - the fan inside the laser, located at the exhaust port.
Pipe fan - an additional accessory that is added to the laser exhaust system for the fume hood. It is attached as close as possible to the exhaust air opening.
Exhaust Duct - the physical tubing that connects the laser device's exhaust port to the duct fan or exhaust vent.
Electrical Grounding - An electrical ground is a current path that provides an alternate path for electrical currents to be conducted to earth in the event of a failure in the wiring. In general, it provides a physical connection between the earth and the electrical systems and devices in your home.
USB/Ethernet Cable - a cable that carries a signal between your computer and your laser device.
Jogging - moving the laser head around the work bed using the arrow keys on the control panel.
How is the laser cooling system of a CO2 laser engraving machine set up?
This guide to setting up the laser cooling system is intended as a supplement to the instructions in section 3.5 of the OMTech manual.
After you have received your device, unpacked it and performed the initial inspection to ensure that the laser tube has no cracks or damage, the first step is to prepare the cooling system. To connect your water pump or radiator, do the following:
1. When installing the water hose: Although the hose can be attached to the fitting with cable ties, it is better to use hose clamps. WARNING: Do not overtighten cable ties or hose clamps. They should be tightened enough to prevent leakage, but not so tight that the fittings or hose are damaged.
2. Connect the water hose from the OUTPUT of the water pump or cooler to the IN of the laser machine. Tighten the cable ties or hose clamps.
3. Connect the water hose from the OUTLET of the laser machine to the water pump reservoir (floating) or the INLET of the chiller. Tighten the cable ties or hose clamps. Pay attention to the connection: each outlet is assigned an inlet. NEVER connect the outlet to an outlet and the inlet to an inlet.
4. Fill the water pump or radiator reservoir with distilled water.
a. ONLY use distilled water or deionized water.
b. Tap water MUST NOT be used.
c. NEVER add any chemicals such as bleach or antifreeze to the water. This will result in the warranty claims for your laser tube becoming void.
5. Connect the water pump or cooler to an electrical outlet. This turns the water pump on. If you have a cooler, set the switch to ON position.
6. Visually confirm that the water is flowing through the laser tube.
A. Check all connectors for leaks (including connectors inside the laser machine and on the laser tube).
B. Check the laser tube for water bubbles.
a). If bubbles are found, try turning the pump/cooler off and on a few times.
b). If it doesn't work, try placing the water tank or cooler higher than the laser tube during operation.
7. If using a cooler, follow the manufacturer's instructions for setting the temperature range for the cooler. The recommended temperature range is 16°C to 21°C.
How is the exhaust system of a CO2 laser engraving machine constructed?
This laser exhaust system setup guide is intended as a supplement to the instructions in section 3.6 of the OMTech manual.
Now that you have the laser cooling system set up, the next thing you need to do is set up the laser exhaust system. The best ventilation method for laser engraving machines is to route the 6 inch hose outside through a window or other suitable vent. The laser device has a built-in fan (or fans, depending on the model). If you intend to use this(s) as the only ventilation, you should keep the exhaust hose as short as possible.
Assemble the laser exhaust system (without tube fan) with the following procedure:
1. After installing the exhaust air opening, mount the supplied exhaust air hose and hose clamps.
a. One end of the exhaust pipe attaches to the outlet port of the laser machine and the other end to the exhaust port.
b. Use the supplied hose clamps to attach the exhaust duct to the exhaust port and exhaust port. Do not overtighten the hose clamps. The hose clamps should be tight enough to seal the connection but not damage the exhaust line, outlet fitting, or exhaust port."
2. Test your laser exhaust system by turning on the device. The internal fan always runs when the device is switched on.
3. Make sure that the air is coming out of the exhaust vent (on the outside of the cabinet or equipment).
a. If using a vent with a built-in damper, make sure the damper is open and air is flowing out of the vent. If the damper does not open:
a). Make sure you have installed the exhaust system correctly and that the hose between the exhaust port and the exhaust vent is as short as possible.
b). You may need to purchase a duct fan to provide sufficient airflow for the damper to open."
Purchasing a duct fan is a very common retrofit to remove the fumes/smoke. OMTech offers a variety of tube fan variants. When installing a pipe fan, you should ensure that the fan is attached to the housing as close as possible to the exhaust point. This way the fumes are extracted from the machine much better than being pushed through the exhaust duct.
To assemble your laser exhaust system with a tube fan, do the following:
1. After installing the exhaust air opening and the tube fan, mount the supplied exhaust air line and hose clamps.
a. One end of the exhaust pipe attaches to the outlet port of the laser machine and the other end to the duct fan.
b. Use the hose clamps provided to attach the exhaust duct to the outlet fitting and the duct fan INLET. Do not overtighten the hose clamps. The hose clamps should be tightened enough to seal the connection but not damage the exhaust duct, exhaust port or duct fan.
2. Test your laser extraction system by turning on the device and the fan.
3. Make sure that the air is coming out of the exhaust vent (on the outside of the cabinet or equipment).
If using a vent with a built-in damper, make sure the damper is open and air is flowing out of the vent. If the damper does not open: Make sure you have installed the exhaust system correctly and that the duct fan is mounted in the correct orientation (the OUTLET of the fan should connect to the exhaust port).
Integrated laser safety features
The laser machine is equipped with safety features to ensure that the risks associated with operating a laser machine are minimized. These safety features include door/lid sensors that ensure the door is closed prior to firing the laser, and specially tinted glass that ensures the laser beam does not exit the unit through the viewing windows.
For your safety, NEVER leave the laser device unattended while it is in use. Laser engraving burns or vaporizes materials with excessive heat and poses a fire hazard.
WARNING: Turning off or bypassing any of the safety features, or operating the laser product while a safety feature is not functioning, could result in serious personal injury and/or property damage.
Laser eye protection
An additional precaution is eye protection. You cannot use just any safety glasses, but must purchase and wear special laser safety glasses that are specifically designed to protect the 10,600 nm CO2 laser.
Before operating your CO2 laser engraving machine, you must also read all sections in Chapter 2 - Safety Information in the OMTech manual.
Electrical grounding of your laser engraving and laser cutting device
Grounding via a 3-pin socket
Your laser machine must be electrically grounded for safety reasons. In most cases, grounding is done using the standard power cord (assuming your outlet has a 3-prong grounded plug and your home or building wiring is properly grounded). If you live in a home with a 3-prong plug that has a third grounding wing, you do not need to additionally ground the device.
Grounding via a special cable
If you live in an old house/building without proper grounding, you must remember to connect a building ground wire to the machine. For cases where grounding is not known or cannot be done through the power source, a separate cable is provided to ground the device. One end of this cable is connected to the grounding terminal of the laser device, while the other end should be firmly connected to a grounded object (e.g. to a metal ground inside the housing or by driving in the ground rods according to local regulations).
Eine vollständige, schrittweise Anleitung zur Installation eines Erdungskabels finden Sie in Abschnitt 3.4 des OMTech-Handbuchs - Elektrische Erdung.
Summary
In this article, we covered the setup of the laser cooling system, the laser exhaust system, the relevant laser safety measures, and the initial setup and testing of the laser machine. The next step is to read the operating instructions in Chapter 4 of the OMTech manual. You can then learn how to ramp test the laser to determine the correct focal length for the lens and how to further test and optimize the laser system.
Related Articles

OMTech Laser
22.November.2023
The Ultimate Guide to CO₂ Laser Engraver Maintenance
Ensure peak performance for your CO₂ laser engraver with preventive maintenance. This article covers essential tips to keep your machine running smoothly.

OMTech Laser
11.September.2023
How to test the laser engraving system of CO2 Laser Engraving Machine?
The following instructions for testing the laser engraver are intended to supplement the instructions in Section 3.9 of the OMTech Manual - Initial Testing.
OMTech Laser
21.November.2023
You should know: the importance of testing speed and power before using a laser engraver
This article discusses speed and power in laser engraving, providing guidance on testing and configuring these parameters for different materials. Learn more!