How to test the laser engraving system of CO2 Laser Engraving Machine?
The following instructions for testing the laser engraver are intended to supplement the instructions in Section 3.9 of the OMTech Manual - Initial Testing.
After the cooling system is put into operation, the exhaust system is working properly and the safety instructions are brought to mind, you can start testing the laser machine. To test the laser machine and ensure its functionality, do the following:
Test of the reference travel of the laser head
Your CO2 laser engraving machine has a gantry rail system that moves the laser head along the X and Y axes around the work bed. Homing refers to the origin point of the laser head - the point to which the laser head returns when you turn on the machine.
Each time you turn on your machine, the laser head should move to either the left or right rear of the work area. Make a note of the point of origin because we need this information when setting up the software.
Jog movement test
As already mentioned, the portal rail system makes the movement of the laser head on the work bed. It is important that the rails, motors and belts ensure smooth, even movement of the laser head. This test is necessary to ensure proper operation of the machine's gantry rail system.
1. Use the arrow keys on the control panel to jog (move) the laser head around the bed.
2. Move the laser head to each corner and make sure you don't hear or see any grinding, stuttering or unwanted pauses.
3. The laser head should move freely and smoothly.
4. Note that the laser head will NOT reach every inch of the honeycomb table. That is normal.
Autofocus test (if available)
Autofocus is a feature that includes a small plunger sensor next to the laser head nozzle. This plunger allows to detect the height of the work piece and ensure the correct object distance of the laser head nozzle. If your device has auto focus, you will see a red plunger mounted on the laser head assembly.
To test autofocus you must:
a. First place a piece of material under the laser head (namely under the red auto focus plunger mounted on the laser head). You can use any hard material, but wood is recommended.
b. Before proceeding, make sure the red auto focus plunger is hitting the footage as the bed moves.
c. Click the FN button on the control panel. Use the up or down arrow keys to scroll to the Auto Focus feature. Click the Enter button on the control panel.
d. The bed will rise until the red autofocus plunger engages, then the bed will lower to the appropriate height.
Pulse test of the laser tube
Before beginning this test, be sure to read all sections of Chapter 4 - Operation in your OMTech User Manual.
During the pulse test of the laser tube, the laser beam is activated for a very short time to check that it is working properly. This test is necessary to ensure that the laser tube is working properly before using the device.
1. To test the laser tube, make sure a scrap piece of wood is placed under the laser head.
2. Make sure the water pump or chiller is on and the water is at the correct temperature.
3. Make sure the door/lid is closed.
4. If your machine is equipped with a key and/or laser switch, make sure they are turned on.
5. Press the Pulse button on the control panel.
a. The controller should beep and the laser should fire (you should see a small mark on your piece of wood).
b. When pulsing the laser, no arc should form. Arc can usually be recognized by its noise and lack of laser ignition.
c. If the laser did not fire, you may need to increase the minimum power of the controller because different laser tubes require different minimum powers to fire.
d. If the Ruida controller shows an error, look for solutions in this article.
Omtech laser test keychain file
The controller comes with a keychain file that the factory used to test the laser before delivery. Using the test file is a good way to ensure the laser is working properly before trying your own files.
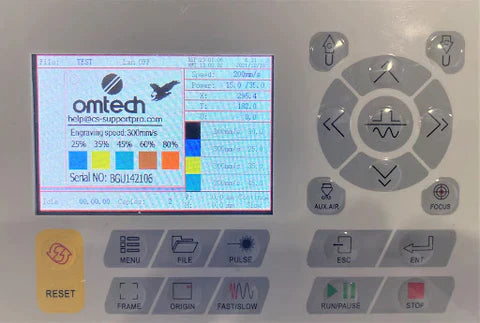
1. Click the File button on the control panel.
2. Only one file called "Test" should appear on the screen. Click the "Enter" button to load the factory test file into the controller.
3. Place a quarter inch thick scrap piece of wood or acrylic into the unit. If you don't have this available, another leftover piece of wood will suffice.
4. After positioning the laser head over the material, focus the laser by mounting the bed at the desired height (either with autofocus if available, or with manual focus).
5. Click the Frame button on the control panel. If necessary, place your material directly underneath the framed area. You may need to click the Frame button again until the framed area is included on your material.
6. With the water pump/radiator running, the exhaust system on and the door/lid closed, click the start button on the control panel. The machine will run the factory test file.
1. Review the laser test file results.
a. The file contains predefined laser engraving settings, will raster at 300mm/s and will vary with the power settings (%) listed in the file.
b. The laser will also cut around the image and cut a hole in the top left corner to allow a key fob to be attached. Laser cutting at the predefined settings takes place at a speed of 10 mm/s and a power percentage of 90%. However, we do not recommend using more than 70% power for other projects.
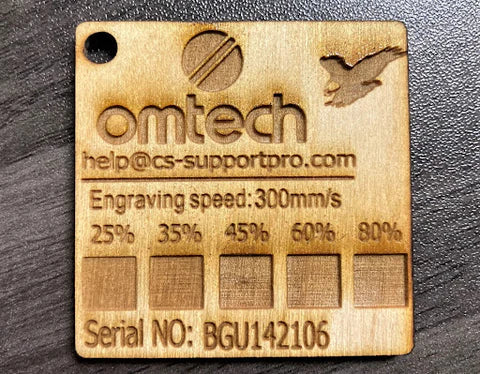
c. WOOD ANALYSIS: When tested, your keychain file for laser testing on wood should look similar to the image below. The engraved edges should appear sharp and clean, however brown burn marks may appear around the edges of the characters - this is normal and you can easily sand away these marks after lasering.
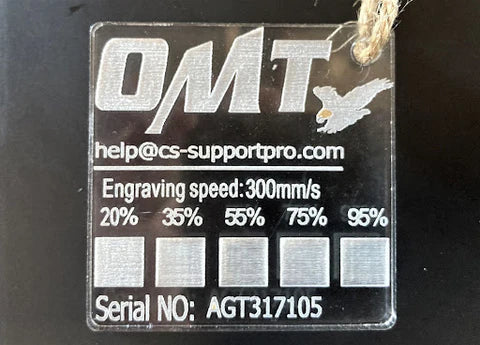
d. ACRYLANALYSE: Bei der Prüfung sollte Ihre Schlüsselbunddatei zum Lasertest auf Acryl ähnlich wie in der untenstehenden Abbildung aussehen. Die eingravierten Kanten sollten scharf und sauber erscheinen. Die Gravurfelder sollten mit zunehmendem Leistungsprozentsatz tiefer werden.
Network/Software

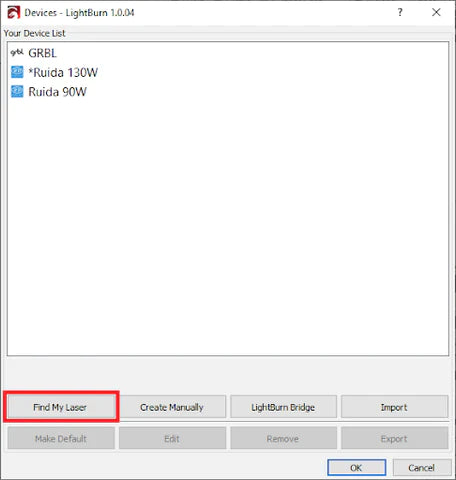
Click the “Find My Laser” button.
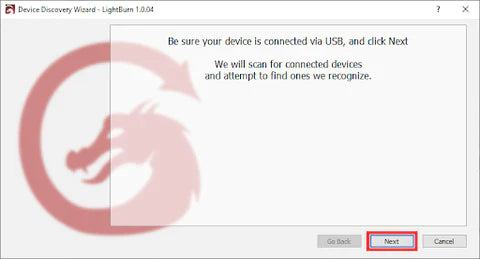
Click on the “Next” button.
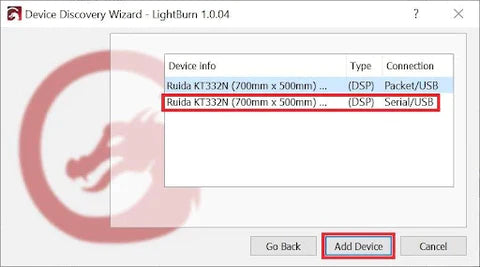
Click on the device with the “Serial/USB” port and then click “Add Device”.
If you want to change the name, you can do it here. Also make sure that the X and Y dimensions of the workspace are correct, then click Next.
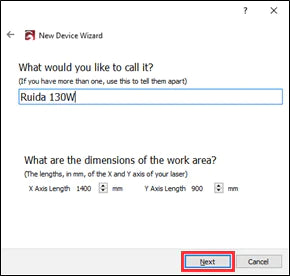
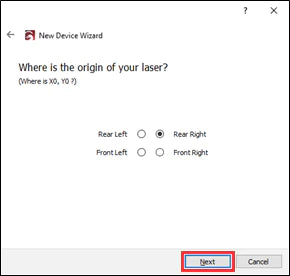
Select the origin point (reference point) that we noted earlier.
Click "Finish."
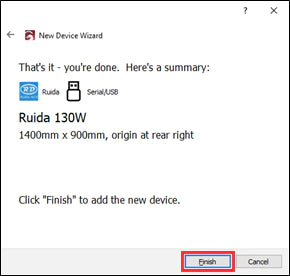
Your laser engraving machine setup is complete and it is ready to use with LightBurn.
Related Articles