


Maximizing Laser Processing with Lightburn: A Complete Guide from Basic Concepts to Material Engraving Techniques
Laser engraving machines have become essential tools in various fields such as modern crafts, woodworking, acrylic engraving, leather engraving, and paper engraving. Lightburn, as a powerful laser cutting and engraving software, can help you unleash the full potential of your laser engraving machine. In this ultimate guide, we will provide a detailed description of how to maximize laser processing with Lightburn, including the entire process of laser engraving using Lightburn and tips and considerations for laser engraving on different materials.
Basic Concepts of Lightburn Laser Processing
Before we begin, let's first understand some basic concepts of Lightburn laser processing. A laser engraving machine is a device that uses a laser beam to cut, engrave, and mark materials. Lightburn, designed specifically for laser cutting and engraving machines, features an intuitive user interface and rich functionality. It supports multiple file formats such as SVG, DXF, BMP, etc., allowing you to easily import and edit your designs. Additionally, Lightburn provides powerful graphic editing tools, layer management, path optimization, and parameter settings, giving you flexible control over the laser processing process.
How to use Lightburn Software
Setting up your laser in Lightburn
Before we get into the design features of the Lightburn Laser Software, we start by connecting your OMTech CO2 Laser Engraver to the computer and ensuring that it can talk to the software. Connect your OMTech laser to the computer with a USB cable. Although you can load files onto a USB thumb drive and plug them into the Laser, controlling it through a USB connection is by far the easiest way. Advanced users can also use Ethernet IP connections.
Once connected, open your Lightburn laser software and click on Laser in the Windows menu item. This will open the Laser dialog window on the right-hand side.

Now, click on theDevicesbutton and when the new window opens, click onFind my Laser. This will open a window asking you to ensure that the USB cable is connected (don’t forget to your laser cutter on) and after clicking OK, the Lightburn software will automatically find the new laser.

It should automatically recognize the laser controller as being Ruida, and you can now give it a name (important if you have more than 1 laser cutter connected to the computer), and specify the size of the laser cutter bed. Note that most of the Lightburn software works in the metric system, so measurements are typically in millimeters (mm).
Finally, you will be asked where the Origin of your laser is and typically this is in the Right Rear of the bed although you can change this later if you wish.
You will now be presented with a confirmation of your settings and the setup is complete.

Lightburn basics: the Lightburn workspace
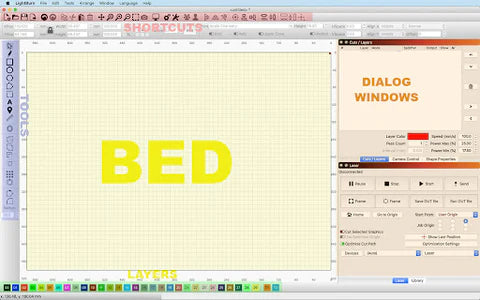
The Lightburn software interface can seem a little daunting at first, but it is well laid out and you will quickly get used to it.
The icons along the top are shortcut buttons for the Menu items. You can ignore them to start with and just use the menu until you become more familiar with them. The really interesting buttons are down the left-hand side, along with the colored boxes along the bottom.
Using Layers in Lightburn
We will start with understanding layers as this is a critical feature of Lightburn software and how it controls the laser cutter.
A layer comprises all of the lines and elements that have the same laser settings. So, as an example, imagine a simple design for a keyring — a name is engraved onto the wood and the wood is then cut out. Obviously, the power and speed of the laser need to be different for the engraving than for the cutting out and so the lines for each are placed on different layers. One layer is set for the appropriate speed and power for engraving and the other layer is set for the speed and power for cutting.
Lightburn software gives us 30 different layers to play with, each can have its own settings for the laser including speed and power, as well as the ‘mode’ that is to be used, for example, a simple line, or a fill where the whole shape is engraved.
Two special layers, T1 and T2 are also provided. These are purely to draw layout guide shapes to say, align things, add notes, etc as they are never sent to the laser.
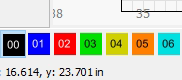
As you can see, each layer has a different color and all of the lines and elements on that layer will have the same color.

Change the speed, mode, and power of each layer in the Cuts/Layers dialog window choose whether that layer should be output to the laser or not. Layers can also be hidden completely as well as instructing the laser to switch the air assist on (cutting) or off (engraving), if you have automatic air assist controls installed.
One point to note is that layers are generally sent to the laser from the top to the bottom of the list, so use the ^ and v buttons to sort them - engraving should always be performed before cutting.
Designing images in Lightburn Laser Software
In the middle of the Lightburn screen, you will see a representation of your laser bed with the 0,0 origin in the top right corner.
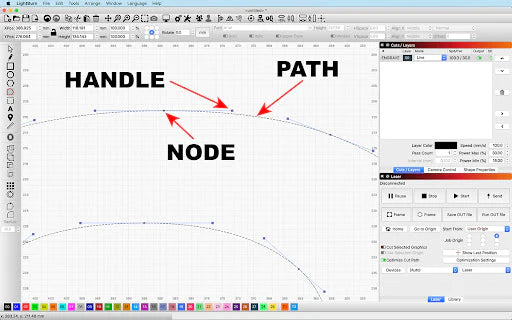
On the left-hand side are a series of icons that give you access to some very creative tools. If you have used graphics software before, some of these will be familiar to you, however, remember that Lightburn software is working in vectors, so everything is comprised of nodes and handles.
Start by selecting the square icon and placing your cursor onto the bed and dragging out a square or rectangle (hold down the shift key to force it into a square shape).
When you have drawn the box, you will see that it is black and that a black layer has appeared in the Cuts/Layers dialog window. By clicking a different colored layer box you can change the layer of the square that you just drew.
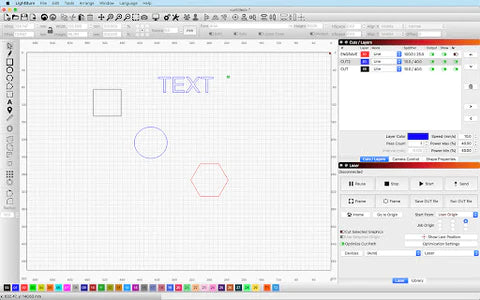
The circle works in the same way — draw an eclipse or use Shift to force it to a circle and the hexagon creates hexagons.
Now there is an important thing to note at this point. As I said previously, Lightburn works with vectors comprised of Paths, Nodes, and Handles. However, the square, circle, and hexagon are known as ‘primitives’ and these are simple shapes that have not yet been converted into paths. The advantage of this will become obvious when we get into editing the vectors but it is a good idea to keep the primitives for as long as possible until you find the need to edit them beyond the basic shape.
The other significant tool in the left-hand menu is the A, the text icon. Text can be added to any design using any font that is installed on your computer, so start by clicking A and then click on the bed. Start typing and the text will appear in the currently select font and size which you will see at the top of the screen. You will also see additional text controls that allow you to adjust the appearance and layout — experiment with these to understand how they affect your text.
Again, the text is stored as primitives but you will have the ability to change this later.

The next tool is called the Offset Shapes tool and this is extremely useful when you understand how it works.
Start by selecting the square that you drew early (use the arrow at the top of the left-hand icons to choose the Select tool). When selected, the square will turn into ‘marching ants’.
Select the Offset Shapes tool and a dialog window will appear and you can select whether you want the offset to be inwards or outwards, how far you want it to be from the original and whether you want the original to be deleted afterward. Experiment with the settings and observe how they affect the result.
Tips and Considerations for Laser Engraving on Different Materials
Lightburn can be used for laser engraving on various materials, including wood, acrylic, leather, paper, etc. Here are some tips and considerations for different materials:
Wood Engraving: Choose the appropriate type and thickness of wood, and adjust the laser power and speed to achieve clear engraving effects. Harder woods may require higher power and slower speed, while softer woods may need lower power and faster speed. Before wood engraving, it is advisable to conduct tests and adjustments to find the optimal parameter settings for your specific wood.
Acrylic Engraving: Acrylic is a commonly used material for laser engraving, allowing the creation of various artworks and decorations. Select the appropriate type and thickness of acrylic, and adjust the laser parameters to avoid scorching and smoke generation. Acrylic engraving typically requires lower power and faster speed to achieve clear etching marks and edges.
Leather Engraving: Leather engraving is a popular application in laser processing, used for creating leather products, leather artworks, etc. Different types and thicknesses of leather require different laser parameter settings. Thinner and softer leather usually requires lower power and faster speed, while thicker leather may need higher power and slower speed. Before leather engraving, applying a thin layer of masking tape on the leather surface can help reduce scorching and smoke generation.
Paper Engraving: Paper engraving is a delicate and interesting laser processing application, used for making greeting cards, paper crafts, etc. Choose the appropriate type and thickness of paper, and adjust the laser parameters to avoid scorching and tearing. Paper usually requires lower power and faster speed for engraving to achieve clear effects. Before paper engraving, ensure that the paper is firmly fixed on the worktable to prevent movement or shaking.
Conclusion
Through this ultimate guide, you have learned how to maximize laser processing with Lightburn. From the basic concepts of laser engraving machines to the entire process of laser engraving using Lightburn, as well as tips and considerations for laser engraving on different materials, you can now confidently utilize the Lightburn software to create exquisite works. Whether you are engaged in woodworking, acrylic engraving, leather engraving, or paper engraving, Lightburn will be an indispensable assistant, helping you realize the limitless possibilities of laser processing.
Related Articles